Showing posts with label fitting techniques for knitters. Show all posts

Designer Secrets - The Chest vs. the Bust measurement


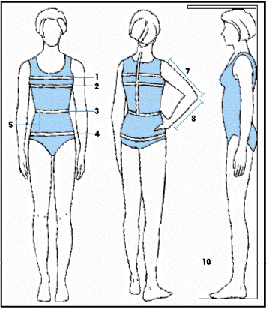
The chart on the right comes from here The one on the left is from here It's the CYCA chart that many Knitting designers use as a standard when grading all patterns. The one on the right shows a chest measurement at 1 and a bust measurement at 2. CYCA shows only a bust measurement.

I rarely knit from patterns. On the odd occasion I do it's usually because the design has a feature or technique I'm really interested in trying. The last pattern I knit was this
one It's beautiful!


As you can see with this design the pattern size choice based on a bust measurement makes sense but it doesn't for every pattern. In particular those with set in sleeves. I've been custom designing for my own unique measurements for so long that I'd forgotten how difficult it can be for Knitters to choose the correct size when using patterns. When I was taking sewing classes I was taught to take both bust and chest measurements to aid in choosing the correct pattern size especially if you were over a B cup. The thinking was that while bust measurements gave you the width required the chest measurement was more closely based on bone structure size. Normally it is easier to make the bust bigger than it is to change the shoulder, armhole and sleeve cap relationship. If I use the CYCA standards I drop a size by using the chest measurement. My back waist length isn't even on the chart because I'm 5'2". If I look at my upper arm measurement I go up a size? I sound like I must be some sort of a science fiction mutant don't I? Well I'm not... I'm pretty average. So what I'm getting at here is that it doesn't really matter what standard measurements a designer starts from because the reality is that almost every knitter will need to make some adjustments to fit their pattern to their body. You will always need to compare your measurements to the patterns and adjust accordingly. So try taking a chest measurement especially if your sweaters don't fit at the shoulders and neck and see if that changes the size you would change on the pattern. See this previous posting for an adjustment idea if you need more space in the bust area only and this one here for making your sweater fronts bigger.

Make it Fit - Designer Secrets and Why Sizing is so Difficult


Sizing is the biggest problem that most hand knitters face. When shopping for ready to wear clothing we have a plethora of size choices; juniors, misses, petites, plus petites, plus sizes and tall girls to name just a few.

When sewing the category names are different but to offer just one example Vogue patterns come in 5 different ranges. The following information is from their website.


"Misses’ patterns are designed for a well proportioned and developed figure; about 5'5" to 5'6" (1.65m to 1.68m) tall without shoes. Misses’ Petites patterns are designed for the shorter figure; about 5'2" to 5'4" (1.57m to 1.63m) tall without shoes." There are 11 sizes in these 2 ranges from a bust of 30 ½ inches to 48 inches.


"Women’s patterns are designed for the larger, fully mature figure, about 5'5" to 5'6" (1.65m to 1.68m) tall without shoes.Women’s Petites patterns are designed for the shorter woman's figure; about 5'2" to 5'4" (1.57m to 1.63m) tall without shoes." There are 10 sizes in these 2 ranges from a bust of 36 inches to 54 inches.


"Today's Fit patterns are designed for the changing proportions of today’s figure; about 5'5" without shoes. The waist and hips are slightly larger than Misses’ and the shoulders are narrower." There are 10 sizes in this range from a bust of 32 inches to 55 inches. This comes to a total of 52 different sizes.


Most hand knitting patterns come in from 3 to about 7 sizes with no variation in length or figure type. There are many reasons for this simplification several being due to cost, publication space, the difficulty of grading each size individually,the inability to have every size test knit as well as an industry that underpays designers. So what's a knitter to do? I'm still thinking about this. As a designer I'm considering doing patterns that would target these specific markets but the question is would you buy them? LMK what you think.

I Need 3 Volunteers

I want to know what your most difficult fitting problems are.

If you post your specific issue in the comments I'm going to sort the posters by category of problem and draw 3 names (each will fall into a specific fitting problem) I'd like to work with each one of you to develop a customized knitting schematic for a basic cardigan. You will need to be prepared to provide me with a detailed set of measurements as well as details on ease preference, gauge of yarn and some pictures to assist me with this process. You also need to be willing to let me post about the process. I won't use your name if you prefer but I will use your measurements. I hope to post one schematic "intervention" per month. You need to be a confident Knitter for this process to be useful to you. It will provide you with enough specific fitting information that going forward you can continue to knit from patterns but will be able to choose the correct size more accurately and make the required adjustments to fit and flatter your unique body.

So are you interested? The draw will be held on Oct. 15th

How to Give the Girls Some Extra Room

The normal knitting advice for Knitters of the curvy sort recommends using short rows to add the extra fabric where it is required. There is another method that you can use if short rowing won’t work due to stitch patterns that would be distorted.

On each side seam increase a few stitches below the bust line and knit a few extra rows in length. Use an existing garment to help you determine how many rows are required by examining how much your garments typically pull up at the waist line. Use another sweater or stretchy garment as your baseline not a woven item. Later decrease the extra stitches as you work your underarm decreases. (I’m assuming a set in sleeve is being knit). This makes your front longer and wider. When the garment is seamed. Sew it up matching row by row front to back until you get to the bust increases. At this point ease the extra rows in by matching 1 row from the back to 2 rows at the front and then back to the 1-1 ratio alternating as required based on the number of extra rows. You are easing the knitted fabric in creating a curved area to accommodate your curves. Let me know what you think and how this technique works for you.

The Things the Ease Charts Don't Tell You

Make It Fit and Flatter

Ease is the space between your body and the garment you are wearing. It determines if you can move comfortably and how your garment looks to others. Is it tight or over sized, does it flatter you or do you look lost inside your clothing.

I have read everything I can find on ease.I've compared all of the various charts. I've read what both knitters and sewers have written in an attempt to find a clear and simple way to teach this concept to my students. I've taken pattern drafting classes, courses from other knitters and I have a long history of both sewing and knitting.

Most of the charts look like the one I've copied in below from http://www.yarnstandards.com/sizing.html

Fit Chart

Very-close fitting:
Actual chest/bust measurement or less

Close-fitting:
1–2"/2.5–5cm

Standard-fitting:
2–4"/5–10cm

Loose-fitting:
4–6"/10–15cm

Over sized:
6"/15cm or more

The first thing you will notice is that this information is pretty vague. Also notice that there is no numerical measurement of negative ease. The charts don't give any information about the hand of the fabric either. Hand refers to the feel of the fabric in terms of stiffness or drape. Think about the difference between a light as air silk mohair, a heavy silk ribbon yarn that drapes and 100% wool that has been felted. As you can imagine each of these has very different ease requirements. The general rule is that the stiffer the fabric the more ease that is required. But how much exactly?

When sewers buy a pattern meant to be used for knit fabrics the back of the envelope includes a stretch scale. The scale is there so that you can compare the fabric you plan to use against what the designer intended. It determines that you will have the correct amount of ease. Even here it is assumed you picked your right size by actual measurements not by the size number of ready to wear clothing or the size you hope to be after your next diet.

Unfortunately there is no comparable scale for hand knitters. Often we don't even have access to the original yarn choice of the designer. Yarn substitutions are common and your LYS will do the best they can to advise you. Your swatch is where the most information comes from but you don't have that until after you buy your yarn and if you are a novice knitter you don't yet have the experience to get all the information you need from your swatch.

When you are buying a pattern the designer has tried to work all of these factors out in advance for you. Unfortunately even our best attempts often fail our audience. The individual knitter may have difficulty getting the recommended yarn, getting gauge or they may choose to knit the wrong size if the pattern is not interpreted correctly.

One of the reasons for this has to do with individual preference. Some of us like close fitting garments and some of us don't. As a knitter you need to figure out what you personally like and the best way to do that is to look in your own closet. Measure yourself, measure a few of your favourite garments and compare to the chart. It will give you a starting point when choosing which size of the pattern you are going to knit and what adjustments you need to make to that pattern.

I'm going to write several posts on ease going forward so come back to review those and I also recommend that you read this one http://retroknit.net/blog/?p=143
Kristen Rengren is writing a series on using Vintage patterns. The whole series is great so read them all.

Sewing Tricks for Knitters

Make it Fit


One of the differences between sewers and knitters is that sewers tend to do a lot more pre-work to perfect the fit of their garments. A sewing pattern is just a starting point and many of them will sew a "muslin" before cutting into more expensive fabric.

A muslin is a mock up of the intended garment sewn from inexpensive cotton muslin fabric. If you take this idea and apply it to your knitting you will be able to customize the fit of all knitting patterns for your garments to your individual shape or for the intended wearer.


As a knitter instead of using a woven cotton fabric you can substitute a medium weight knit fabric. You want to choose something with a little stretch as your knitting also has stretch. If you have a specific pattern in mind you can use the schematic measurements to draw the pattern out and transfer to the fabric adding seam allowances. An alternative is to buy a sewing pattern meant for knits. Look for something like this http://www.jalie.com/women-s-twin-set.html or look for a pattern close to the silhouette you would like to emulate. Cut out your mock up and sew it up. You can do this by hand or machine if you have one. Sew everything together with large loose stitches as you may want to tear them out and re-seam as you correct the fit. The neckline will be a raw edge so you need to run a row of stitches along the edges to stop it from stretching out when you put the mock up on.

Now look at the length and mark where you usually like your sweaters to hang to. Check the shoulder line, is it in the right spot? If its too low or too high mark the correct spot and then remove one sleeve and move it up or down as required. Once you are happy with the shoulder line mark the hem of the sleeve. Mark more then one length of hem so that you will have a permanent record of various lengths for future projects. Mark where your natural waistline is. Look at the neckline and decide if it's too high or low. If the mock up is too tight cut it open and use safety pins to add fabric where is it required. Use pins to make it smaller if necessary Once you are done you can transfer back to the paper pattern any alterations you made and as well take notes of the measurements that you prefer. You will use these details going forward to compare the pattern measurements on knitting schematics and then change them to more accurately fit and flatter your own body. As an example you can use the length measurement to get the bottom edge at the right spot for you and make sure that any waistline shaping is at your natural waistline by either adding or eliminating rows of knitting as required.

This post is a basic starting point for fitting I will write future posts on specific fitting issues so watch for further updates and if you want me to cover a specific topic let me know.